

Key Takeaways
- A wooden boat can take six months to a year to build depending on various factors
- Your construction method might help save you time to build a boat
- It is best to have your own boat design before building a wooden boat
The construction of a wooden boat is a delicate, time consuming process. But how long does it take to build a wooden boat?
A first time builder may take anywhere from several months to a year to complete a basic, compact wooden boat. A more extensive and complicated boat may take an experienced builder several months to several years to build.
Building a wooden boat can fluctuate extensively based on several key factors, such as the dimensions of the vessel, proficiency of the builder, accessibility of resources and equipment, and the technique used during the building process. As you will read, boat building can be a meticulous process especially for those that are tackling their first boat building project.
How Many Man Hours Does it Take to Build a Boat?
A variety of factors affect the length of time to build a wooden boat. Building boats, whether they are a small boat or bigger boat, still require more detail than other recreational vehicles.
According to US averages, it takes approximately 5,000 hours of labor to build a 30-foot daysailer. For a 40-foot weekender, the estimated labor hours range from 9,000 to 10,000. And constructing a 50-foot offshore passagemaker requires anywhere from 20,000 to 25,000 hours of effort.
For small boats, or even a kit boat, this timeframe will vary. To build a wooden boat or plywood boat, the time to build by your own hands can be as soon as a few months to complete.
How to Build a Wooden Boat
When it comes to boat building, you will need to consider a few factors like materials and your woodworking skills. Understanding the boat building process of a small wooden boat is important to get an idea of how much time you are going to be spending on this project.
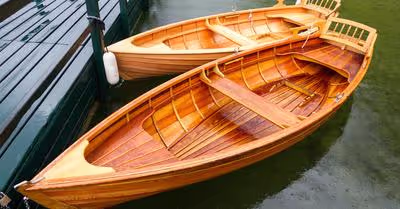
Wood is often the preferred material for a small boat due to its availability, but wooden boats also have the benefit of floating higher in water compared to boats made of denser materials. With that being said, the construction method of other boats might take longer than to build a wooden boat.
Materials
Ideal wood types for boat construction, such as marine grade plywood, teak, and cedar must have the ability to resist decay and prevent marine creatures from penetrating the structure. The abrasion resistance of the wood depends on its density and hardness, which is why hardwoods are commonly utilized for the exterior and softwoods for the interior of the boat.
Other materials and proper tools required to build a wooden boat are:
- Marine plywood
- Screws
- Sand paper
- Fiberglass tape
- Epoxy resin
- Epoxy putty
- Tape measure
- Hand plane
- Urethane glue
- Belt sander
- Cable ties
Boat Plans
If you want to make it to launch day, you will need a boat design in mind. There are three options to consider when building a wooden boat.
You can purchase a book containing wooden boat plans, take time sketching and studying the designs of similar boats in mind, or get advice from a professional boat builder. Making a wooden boat precise with scale will be a difficult task unless you are a detail-oriented individual. If you are sketching, construct a cardboard model of your design to help develop a basic shape. This is an opportunity to refine your sketches and add additional details as needed.
Making Transom and Center Rib
Begin the construction process by bonding the hardwood floorboards to form your transom. After they are firmly joined, spend time carefully tracing its shape and cut it out.
Next, place the transom between two smooth wooden or metal pieces and secure it with clamps to ensure it stays flat. Wrap it in something like kitchen wrap to prevent the wood from adhering to the transom. Alternatively, you could use a stitch and glue method with cable ties and epoxy resin to save you construction time framing out ribs.
Once that is completed, simply smooth out the wood for the center rib and apply glue and clamp it to bind it together. Finally, let the glue dry completely and then carve the keel, chines, and inwales.
Crafting the Frame
To build a wooden frame, utilize clamps and angle brackets to secure the inwales and chines. For temporary support, insert a thwart and keep across the central rib. Accurate shape of the boat is crucial, as it lays the foundation for the final product.
This part of the building process definitely takes more build time depending on your skill level. After ensuring the form is correct, firmly attach the inwales and chines to the transom, stem, and center rib using screws and glue.
Fine Tuning the Frame
After shaping the basic frame, this part of the boat building process requires the finer details. Take precise measurements and create additional side ribs to ensure symmetry.
To make the bottom ribs, create a cardboard prototype to use as a guide when cutting out the wooden ribs. Thankfully, you are now half way there in constructing a wooden boat. Once you have completed the side and bottom ribs, move on to attaching the keel.
Final Steps for Frame Design
Incorporate the keel strip (narrow strips of tape to help protect the centerline length of the hull), then secure the seat rails where you will mount the seats. Exercise caution during this stage of boat building, as you should thoroughly inspect every aspect of the frame. Fill in any gaps with epoxy putty and secure with screws.
Adding Seats and Wooden Planks
Instead of cutting plywood pieces, consider attaching cardboard to the sides and cutting it according to the frame design. With a small boat design, it should not take long to be satisfied with the cardboard cutouts, so use them as a guide to cut the plywood.
Apply glue to the outside of the frame and add planks to the sides of the boat, clamping the plywood every seven to 11 inches. While the plywood is still clamped, measure and drill holes for screws. After that, screw the plywood to the boat and make sure to seal any gaps.
Finally, add planks for the seats in the middle of the boat. Secure them with a plank of wood attached to the keel to prevent bending.
Finishing Touches
Fill any gaps with epoxy putty and smooth by sanding. Patch up any small areas and make sure they are even with the surrounding surface.
Flip the boat upside down and apply a layer of fiberglass while carefully trimming it to seamlessly integrate with the sides of the vessel. Next, coat the entire exterior of the boat with epoxy resin, using rollers and brushes for even coverage. Allow the epoxy to cure completely (about a day or two).
Once that is complete, flip the boat back over and apply a final layer of epoxy resin and fiberglass. Have your sanding equipment and the proper eye protection, as well as lungs while you sand the surface until it is clean and smooth.
For the fun part, you get to paint your first boat whatever color you desire. Once that is finished, you are now able to test the finished boat and sail.